Wednesday 30 January 2013
Wednesday 12 December 2012
Things to Consider When Getting An Alarm System

The First thing you should look at is the number of sensors you are going to need to properly protect your home. Every entry point needs to be protected, e.g. all doors leading to the exterior, all windows and any glass areas that may be easily broken into. Write down the list of sensors to give to your installer. Your list would look something like this.
- 2 Magnetic Contacts (Front and Back Door)
- 10 Vibration Detectors (Burglar proofed windows throughout the building)
- 1 PIR Motion Detector (Enclosed Garage)
Next you are going to section off your compound into zones. For example the two windows in the kitchen could be one zone, or the front door could be one zone. You get the general idea. After sectioned off the property count the number of sections. The figure you come up with will determine what control panel your installer will put in for you.
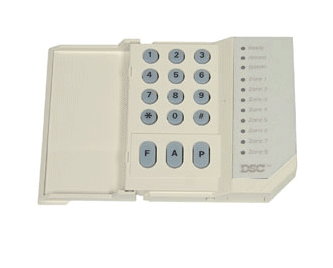
Now you need to choose your keypad and decide if you want to have wireless keys. Different keypads allow you to do different things with your alarm systems and some are more user friendly than others. I use the DSC alarm system so the keypads I am going to show you from that system.
 |
| 8 Zone LED Keypad |
 |
| Fixed Message LCD |
The Semi LCD, as I like to call it, can display up to 64 zones and can display alot more information than the led keypad.
 |
| Full Message LCD |
My personal favorite is the Full LCD. The most user friendly of the keypads and has the most features available. Features which include Auto arming, access to and event buffer which shows all recent activity on the alarm system, with time stamps.

For those who don't have the time to punch in a code every time they have to leave the house their is the wireless keys. These are also a nice option to consider for the elderly and less tech-savvy.
Interior and Exterior Sirens and Strobes are the last on your list but they are very important. In most installations 1 siren outside and one siren inside should be enough but their may be a need for additional coverage in lager compounds.
Your final list given to the installer should look something like this
- 2 Magnetic Contacts
- 10 Vibration Sensors
- 1 PIR Motion Detector
- 1 Eight Zone Control Panel, battery and transformer
- 1 Full LCD Keypad
- 2 Wireless Keys
- 1 Indoor Siren
- 1 Outdoor Siren
The information above should be enough for you to get a pretty accurate quotation but I still advise that you have a professional view the property before equipment is bought.
Tuesday 11 December 2012
What's in My Alarm System
Today I planed on putting up a post called Things To Consider When Getting An Alarm, but on second thought I should educate you a little first. Not many people know what's used in an alarm system and sometimes they don't care to know but they should. Having an alarm system and not knowing anything about it is like having the keys to the front door and not knowing what it's for.
I'll start with the most important part of a burglar alarm, the main panel. This should be placed in the most secure location available. It is the brain of the entire system without this nothing will work. Inside the panel there is a control board and a back up battery. The control board monitors all sensors, controls all sounding devices and communicates with monitoring stations.


The next in line of most important parts of an alarm system is the transformer that powers the main panel. Even though your alarm panel has a back up battery, for long term functioning of the system the transformer needs to be plugged in at a secure location and should never be tampered with. Believe it or not I have seen people unplug this not knowing what it is, it cost them a service charge for 5 mins of work!

Another good thing to have are Wireless Keys, they are great for people in a rush. You can arm and disarm you alarm system at the touch of a button from anywhere on the compound. Also most wireless keys come with a built in Panic Button which can send a audible or silent alarm signal depending on your alarm installation request.

Now lets look at the sensors that monitor attempts to break into your home or business place.

Vibration or shock sensors are used on burglar proof windows to detect attempts of forced entry while allowing occupants to open there window and still be secured. These sensors can also be used on walls if there is a need for it.

PIR Detectors are used to detect the movement of body heat and are usually used indoors as a secondary form of protection.

Glass Break Detectors are used a lot in areas such as shop front display areas.


Things to Consider When Getting A CCTV System
So you have decided you want
cameras. Today I will be talking about a few things to consider when purchasing
cameras for your home or business place.
The first thing I would advise
anyone to do is check the number of areas they would like to cover and come up
with a budget for your project. When doing your budget there are three main
cost factors to consider
- The Equipment cost. This would consist of the cost of the cameras, recorder,
power supplies, UPS, monitor, etc.

- The Installation material cost e.g. wire clamps or electrical conduit for
securing your camera cables, etc.

- a)
The Labour cost of the installation if you decide to hire a technician. Please bear
in mind this is usually a very high cost. The
price to install a camera varies from person to person and can start from about $250 - $500 per
camera or even more depending on the distance the camera is from the DVR to type of camera you are installing etc.
 b) The Networking cost. This involves putting the Digital Video Recorder (DVR) on the internet where the video feed can be accessed anywhere in the world. This can sometimes be done by the installer of the cameras but is often done by an IT professional and would therefore add to the cost of the overall installation.


 Adapters are the
more common of the two so we will talk about those. When using adapters one
must consider finding space to plug them all in and that can cause quite a bit of cluttered
in larger camera systems. Another weak point of an adapter is it allows
fluctuation in your current supply to affect the power supplied to your
cameras. This can reduce the life of your cameras. They are also easily damaged
by short circuits caused by blown cameras or damaged wiring and can sometimes
even cause fires.
Adapters are the
more common of the two so we will talk about those. When using adapters one
must consider finding space to plug them all in and that can cause quite a bit of cluttered
in larger camera systems. Another weak point of an adapter is it allows
fluctuation in your current supply to affect the power supplied to your
cameras. This can reduce the life of your cameras. They are also easily damaged
by short circuits caused by blown cameras or damaged wiring and can sometimes
even cause fires.
To safeguard oneself against this I
usually recommend using a commercial power panel which was designed for long
term use and has built in protection against short circuits and ensures voltage
to your cameras is consistent.

Next let’s talk a little about the cables supplied. They are usually
thin cables that are not very rugged and can be easily damaged during and
installation.
 The shielding on the inside of the cables is usually light and
can ultimately lead to very little protection against interference. (Interference
can look like waves on the screen or rolling of the picture and is usually
caused by electrical wiring). Last but not least they are almost always the
wrong length for the installation.
The shielding on the inside of the cables is usually light and
can ultimately lead to very little protection against interference. (Interference
can look like waves on the screen or rolling of the picture and is usually
caused by electrical wiring). Last but not least they are almost always the
wrong length for the installation.
 The shielding on the inside of the cables is usually light and
can ultimately lead to very little protection against interference. (Interference
can look like waves on the screen or rolling of the picture and is usually
caused by electrical wiring). Last but not least they are almost always the
wrong length for the installation.
The shielding on the inside of the cables is usually light and
can ultimately lead to very little protection against interference. (Interference
can look like waves on the screen or rolling of the picture and is usually
caused by electrical wiring). Last but not least they are almost always the
wrong length for the installation. 
This Post is the hopefully the first of many, please feel free to leave questions and/or suggestions in the comment area below.
Subscribe to:
Posts (Atom)